AWS CDK and python package overview

Why AWS CDK:

AWS Cloud Development Kit (AWS CDK) :

So Cloudformation does still have two disadvantages over terraform ‌

  1. Closed Source
  2. AWS provider native

But the biggest disadvantaqe of not actually being Infrastructure as CODE and state management. That’s gone for good thanks to AWS CDK.

You can use the AWS CDK to define your cloud resources in a familiar programming language. The AWS CDK supports TypeScript, JavaScript, and Python.‌

Advantages of AWS CDK:

  • AWS CDK is open source
  • Use logic (if statements, for-loops, etc) FINALLY!!
  • object-oriented techniques to create a model of your system
  • Organize your project into logical modules
  • Share and reuse your infrastructure as a library
  • Use your existing code review workflow
  • State management ( diff against a deployed stack to understand the impact of a code change)

There is no charge for using the AWS CDK, however you might incur AWS charges forcreating or using AWS chargeable resources

Prerequisites:

The AWS CDK is developed in TypeScript and transpiled to JavaScript. Bindings for the other supported languages make use of the AWS CDK back-end running on Node.js

  • Node.js (>= 8.11.x)
  • You must specify both your credentials and an AWS Region to use the AWS CDK CLI

Installation and Configuration needed

Installation

First install the aws-cdk package‌

npm install -g aws-cdk

Then check the cdk version with:

cdk --version‌

AWS Configuration:

The CDK looks for credentials and region in the following order:‌

  • Using the –profile option to cdk commands.
  • Using environment variables.
  • Using the default profile as set by the AWS Command Line Interface (AWS CLI)

Concepts:

The main concepts to know are constructs,app,stack,resources. Lets look at them one by one.‌

Constuct:

Constructs are the basic building blocks of AWS CDK apps. A construct represents a “cloud component” and encapsulates everything AWS CloudFormation needs to create the component.‌

  • can represent a single resource, such as an Amazon Simple Storage Service (Amazon S3) bucket, or
  • it can represent a higher-level component consisting of multiple AWS CDK resources.
  • The AWS CDK includes the AWS Construct Library, which contains constructs representing AWS resources.
  • Constructs are classes that extend the base Construct class. After you instantiate a construct, the construct object exposes a set of methods and properties that enable you to interact with the construct and pass it around as a reference to other parts of the system.

There are 3 different levels of AWS construct:‌

  • low-level constructs, which we call CFN Resources. These constructs represent all of the AWS resources that are available in AWS CloudFormation.
  • The next level of constructs also represent AWS resources, but with a higher-level, intent-based API. They provide the same functionality, but handle much of the details, boilerplate, and glue logic required by CFN constructs.
  • The AWS Construct Library includes even higher-level constructs, which we call patterns. These constructs are designed to help you complete common tasks in AWS, often involving multiple kinds of resources.

Composition:

  • The key pattern for defining higher-level abstractions through constructs is called composition. A high-level construct can be composed from any number of lower-level constructs, and in turn, those could be composed from even lower-level constructs.
  • To enable this pattern, constructs are always defined within the scope of another construct. This scoping pattern results in a hierarchy of constructs known as a construct tree.
  • In the AWS CDK, the root of the tree represents your entire AWS CDK app. Within the app, you typically define one or more stacks, which are the unit of deployment, analogous to AWS CloudFormation stacks.
  • Within stacks, you define resources, or other constructs that eventually contain resources.Composition of constructs means that you can define reusable components and share them like any other code.

Construct’s have 3 parameters:

  • scope – The construct within which this construct is defined. You should almost always passthis for the scope, because it represents the current scope in which you are defining the construct.
  • id – An identifier that must be unique within this scope. The identifier serves as a namespace for everything that’s encapsulated within the scope’s subtree and is used to allocate unique identities such as resource names and AWS CloudFormation logical IDs.
  • props – A set of properties or keyword arguments, depending upon the supported language,that define the construct’s initial configuration. I

App:

All constructs that represent AWS resources must be defined, directly or indirectly, within the scope of a Stack construct.‌

Stacks

The unit of deployment in the AWS CDK is called a stack. All AWS resources defined within the scope of a stack, either directly or indirectly, are provisioned as a single unit.‌

When you run the cdk synth command for an app with multiple stacks, the cloud assembly includes a separate template for each stack instance. ‌

This approach is conceptually different from how AWS CloudFormation templates are normally used, where a template can be deployed multiple times and parameterized through AWS CloudFormation parameters.‌

Environments:

Each Stack instance in your AWS CDK app is explicitly or implicitly associated with an environment (env). An environment is the target AWS account and AWS Region into which this stack needs to be deployed.‌

if you don’t specify an environment when you define a stack, the stack is said to be environment agnostic.‌

When using cdk deploy to deploy environment-agnostic stacks, the CLI uses the default CLI environment configuration to determine where to deploy this stack. ‌

For production systems, we recommend that you explicitly specify the environment for each stack in your app using the env property.‌

practical:

  1. Initialize a python cdk app
cdk init --language python

2. Create a virtual environment

python3 -m venv .env
source .env/bin/activate

3. Install all the packages

pip install -r requirements.txt

This would be the initial folder structure:

Lets have a look at app.py

#!/usr/bin/env python3
from aws_cdk import core

from aws_cdk_example.aws_cdk_example_stack import AwsCdkExampleStack

app = core.App()AwsCdkExampleStack(app, "aws-cdk-example")
app.synth()

Important parts of the code:

  1. from aws_cdk import core Used to import the core cdk package
  2. from aws_cdk_example.aws_cdk_example_stack import AwsCdkExampleStack app = core.App()AwsCdkExampleStack(app, “aws-cdk-example”)

This section is to import our stack app package created during init and then initialze the app and give it a name. You can customize it to use in different accounts and regions during deployments like this:

new MyStack(app, 'Stack-One-W', { env: { account: 'ONE', region: 'us-west-2' }}); ##in codecdk 
deploy Stack-Two-W ## during deploying

3. app.synth() to create a cfn template of this.‌

Lets modify the code to create a bucket. But first lets install the package for S3.‌

pip install aws-cdk.aws-s3

‌ Now the new code will look like this:

 #!/usr/bin/env python3
 
from aws_cdk import (
    aws_s3 as s3,
    core
)
 
from aws_cdk_example.aws_cdk_example_stack import AwsCdkExampleStack
 
class AwsCdkExampleStack(core.Stack):
    def __init__(self, scope: core.App, id: str, **kwargs) -> None:
        super().__init__(scope, id, **kwargs)
        bucket = s3.Bucket(self, 
        "MyFirstBucket", 
        bucket_name='my-bucket-sdfgdhbfghfjg',
        versioned=True)


app = core.App()
AwsCdkExampleStack(app, "aws-cdk-example")
 
app.synth() 

Just added a class (Thanks to the github python cdk examples>> Their documentation still needs some work) but the main part is this.

‌ bucket = s3.Bucket(self, 
        "MyFirstBucket", 
        bucket_name='my-bucket-sdfgdhbfghfjg',
        versioned=True) 
  • Bucket is a construct. This means its initialization signature has scope, id, and props and it is a child of the stack.
  • MyFirstBucket is the id of the bucket construct, not the physical name of the Amazon S3 bucket. The logical ID is used to uniquely identify resources in your stack across deployments.
  • bucket_name parameter is used to give the bucket a name.

Lets start with the commands‌

cdk ls To view the stacks‌

You should be able to view the stacks you will be creating aws-cdk-example in my case‌

cdk synth to view the cloudformation template that will be created from this code.

cdk deploy to deploy the stack

You will be able to see the changes in the cloudformation console and the bucket will also be created.

Now this is the MOST INTERESTING THING about cdk and gives a tough to Terraform.‌

Although there was drift management in Cloudformation it did not compare to terraform state

Here comes cdk diff

Lets modify the code a bit to add KMS protection to the bucket

bucket = s3.Bucket(self,         "MyFirstBucket",         bucket_name='my-bucket-sdfgdhbfghfjg',        versioned=True,        encryption=s3.BucketEncryption.KMS_MANAGED,)

Now run cdk diff

You will see that it actually tracks that resource and shows what is going to change!! Somewhat similar to terraform state.‌

Now lets deploy this new change using cdk deploy

Thats it!! ofcourse this is just the tip of the iceberg about how powerful this thing is .Essentially it can do everything that Cloudformation could do and more!!‌

Lets destroy the stack using cdk destroy

It will ask for your permission before deleting . Press ‘y’ and the whole stack will be deleted. I have some plans for how to use this as this is python and I can leverage my python skills to create maybe a form type app which will create a IAC cfn template based on the inputs ( Ofcourse its done already 🙂 https://github.com/tongueroo/lono) But I can still do it as a personal project

Docker Swarm Part 2: HTTPS Nginx reverse proxy to the API

So in Part 1 , I covered the basics of Docker Swarm and created a working swarm cluster with 1 master 2 slave nodes. But with just one service, My API container.‌

So in this part I will create another service which will be a Nginx reverse proxy for the API service. Here we go !

Setting up three servers in the swarm, 2 slaves 1 master

NGINX config file setup for reverse proxy

This is the nginx config file to reverse proxy to the api container.

‌ worker_processes 1;
events { worker_connections 1024; }
 
http {


    upstream docker-awsapi {
        server awsapi:8080;
    }
 
 
    server {
        listen 80;
        listen 443 ssl;
 
        ssl_certificate     /etc/nginx/awsapi.com.crt;
        ssl_certificate_key /etc/nginx/awsapi.com.key;
        server_name awsapi.com;
        location / {
            proxy_pass         http://docker-awsapi;
            proxy_redirect     off;
            proxy_set_header   Host $host;
            proxy_set_header   X-Real-IP $remote_addr;
            proxy_set_header   X-Forwarded-For $proxy_add_x_forwarded_for;
            proxy_set_header   X-Forwarded-Host $server_name;
        }
    }
 
 
}
‌
 

Going through some important blocks in the configuration file:‌

Upstream awsapi:

‌ upstream docker-awsapi {
        server awsapi:8080;
    }
    

This parameter is mostly used for load balancing in Nginx. For example:

‌ http {
    upstream myapp1 {
        server srv1.example.com;
        server srv2.example.com;
        server srv3.example.com;
    }
 
    server {
        listen 80;
 
        location / {
            proxy_pass http://myapp1;
        }
    }
} 

In the example above, there are 3 instances of the same application running on srv1-srv3. When the load balancing method is not specifically configured, it defaults to round-robin. All requests are proxied to the server group myapp1, and nginx applies HTTP load balancing to distribute the requests.‌

Ports to listen and https certificate location

‌         listen 80;
        listen 443 ssl;
 
        ssl_certificate     /etc/nginx/awsapi.com.crt;
        ssl_certificate_key /etc/nginx/awsapi.com.key;
        server_name awsapi.com; 

Here, in the first two lines we are listening on port 80 and port 443 respectively. The later will be used for https purposes. Next we have the ssl certificate location and the ssl key location (More on this later). Lastly we have a server name: awsapi.com in this case.‌

Mentioning reverse proxy to api server

‌ location / {
            proxy_pass         http://docker-awsapi;
            proxy_redirect     off;
            proxy_set_header   Host $host;
            proxy_set_header   X-Real-IP $remote_addr;
            proxy_set_header   X-Forwarded-For $proxy_add_x_forwarded_for;
            proxy_set_header   X-Forwarded-Host $server_name;
        } 

In these lines we mention the proxy_pass to be the upstream server we mentioned above.‌

Now that the configuration file for nginx cotainer as reverse proxy is made. Lets create certificated cert and private key files to make the nginx container https.‌

Here’s how I have kept the structure for the code:

Create cert file and key ‌

openssl req -newkey rsa:2048 -nodes -keyout nginx/awsapi.com.key -x509 -days 365 -out nginx/awsapi.com.crt

You will have to fill in the following questions;‌

  1. Country Name (2 letter code)
  2. State or Province Name (full name)
  3. Locality Name (eg, city)
  4. Organization Name (eg, company)
  5. Organizational Unit Name (eg, section)
  6. Common Name (eg, fully qualified host name)
  7. Email Address

Once done your folder structure should look like this:

‌This is a self-signed certificate so its not a production solution perse. You will need a CA for a valid certificate. Letsencrypt and certbot is an excellent solution to it but I was unable to use it due to not having a url yet. But will definitely recommend it over a self signed certificate.

Adding service in docker compose file:

This was the previous docker-compose file:

‌ version: '3.0'


services:
 
  awsapi:
 
    image: darshanraul/awsapi:latest
 
    container_name: awsapi
 
    deploy:
 
      replicas: 4
 
    ports:
 
      - "80:8080"
 
    networks:
 
      - sample_network_name
 
networks:
 
  sample_network_name: 

There was just one service with four replicas.

This is the new docker-compose.yml.

 version: '3'
  
services:
    reverseproxy:
        image: nginx:alpine
        #container_name: reverseproxy
        ports:
            - 80:80
            - 443:443
        deploy:
          replicas: 4
        volumes:
          - ./nginx/nginx.conf:/etc/nginx/nginx.conf
          - ./nginx/awsapi.com.crt:/etc/nginx/awsapi.com.crt 
          - ./nginx/awsapi.com.key:/etc/nginx/awsapi.com.key
        networks:
          - aws_network
 
        restart: always
 
    awsapi:
        depends_on:
            - reverseproxy
        #container_name: awsapi
        image: darshanraul/awsapi
        deploy:
          replicas: 4
        restart: always
        networks:
          - aws_network
 
networks:
  aws_network: 

Lets look at the main parts of the new service added: reverseproxy

 volumes:
          - ./nginx/nginx.conf:/etc/nginx/nginx.conf
          - ./nginx/awsapi.com.crt:/etc/nginx/awsapi.com.crt 
          - ./nginx/awsapi.com.key:/etc/nginx/awsapi.com.key 

Here Iam attaching the certificate files and the configuration file to their respective locations on the container.

   ports:
            - 80:80
            - 443:443 

Adding the port 443 for HTTPS connections.

Lets run the swarm now.

On completetion you can see the services using docker service ls

As you can see there are 2 services now api server and the reverseproxy. The replica count is 4 for both . This means that the tasks will be distributed across the slaves and master node.

To check the tasks running for a service, use docker service ps <service_id>

Its working 🙂 Now the only caveat here is that because the nginx conf files and cert keys are not in slave servers the reverse proxy service is not able to mount those files there. There ofcourse is a workaround this > creating a image , push it to a private remote repo and then use it.

But I will be trying for a better solution.

Terraform Overview

https://github.com/scraly/terraform-cheat-sheet/blob/master/terraform-cheat-sheet.pdf

resource “aws_instance” “web” {
ami = “ami-a1b2c3d4”
instance_type = “t2.micro”
}

The name is used to refer to this resource from elsewhere in the same Terraform module, but has no significance outside of the scope of a module.

👍 Resource names must start with a letter or underscore, and may contain only letters, digits, underscores, and dashes.

resource “aws_db_instance” “example” {
# …
timeouts {
create = “60m”
delete = “2h”
}
}
variable “image_id” {
type = string
description = “The id of the machine image (AMI) to use for the server.”
}
variable “availability_zone_names” {
type = list(string)
default = [“us-west-1a”]
}

The label after the variable keyword is a name for the variable, which must be unique among all variables in the same module.

terraform apply -var=”image_id=ami-abc123″
terraform apply -var=’image_id_list=[“ami-abc123″,”ami-def456”]’
terraform apply -var=’image_id_map={“us-east-1″:”ami-abc123″,”us-east-2″:”ami-def456”}’

terraform apply -var-file=”testing.tfvars”

image_id = “ami-abc123”
availability_zone_names = [
“us-east-1a”,
“us-west-1c”,
]
output “instance_ip_addr” {
value = aws_instance.server.private_ip
description = “The private IP address of the main server instance.”
depends_on = [
# Security group rule must be created before this IP address could
# actually be used, otherwise the services will be unreachable.
aws_security_group_rule.local_access,
]
}
locals {
service_name = “forum”
owner = “Community Team”
}

Local values can be helpful to avoid repeating the same values or expressions multiple times in a configuration, but if overused they can also make a configuration hard to read by future maintainers by hiding the actual values used.

$ tree complete-module/
.
├── README.md
├── main.tf
├── variables.tf
├── outputs.tf
├── …
├── modules/
│ ├── nestedA/
│ │ ├── README.md
│ │ ├── variables.tf
│ │ ├── main.tf
│ │ ├── outputs.tf
│ ├── nestedB/
│ ├── …/
├── examples/
│ ├── exampleA/
│ │ ├── main.tf
│ ├── exampleB/
│ ├── …/

https://github.com/hashicorp/terraform/issues/9712

Ofcourse official documentation : https://www.terraform.io/docs/configuration/index.html

Docker Swarm Part 1: Creating swarm from container image

I gave up on the idea of creating a container orchestrated API application because I would not prefer running the backend continuously so that the frontend web apps can get their responses. That is the reason I created a Serverless API backend.

But the container orchestration bug never left me. So heres another attempt to create a Container Orchestration with

  1. My Container API image

  2. Nginx proxy for my backend

  3. Prometheus and Graphana to monitor the stack.

This will be a two part series. In first part I will just orchestrate my API container using Docker swarm. In part 2 I will expand the swarm and add monitoring services like Prometheus and Graphana.

https://dzone.com/articles/monitoring-docker-swarm

https://github.com/stefanprodan/swarmprom

Docker Swarm

A swarm is a group of machines that are running Docker and joined into a cluster. After that has happened, you continue to run the Docker commands you’re used to, but now they are executed on a cluster by a swarm manager. The machines in a swarm can be physical or virtual. After joining a swarm, they are referred to as nodes.

Implementation:

Create 3 instances: 1 master, 2 nodes

I created a 3 server instance group on GCP. You can use your local machine and use docker-machine instead. Steps

Creating docker-compose.yml file in master.

Before initiating the Swarm, We will first create a docker-compose file to define the services. Go to the instance you will be running as a swarm master and run vi docker-compose.yml

Enter this content and save the file.
version: '3.0'


services:

  awsapi:

    image: darshanraul/awsapi:latest

    container_name: awsapi

    deploy:

      replicas: 4

    ports:

      - "80:8080"

    networks:

      - sample_network_name

networks:

  sample_network_name:

Initializing the Swarm

On the instance you intend to be the swarm master, run docker swarm init

You should be seeing an output similar to docker swarm join --token <token>

Copy this and continue to the next step. Your current node is the Swarm master now.

Join the worker nodes

Go to the other 2 instances and paste the docker swarm join --token <token>

Your instances will now become the worker nodes in the swarm.

Deploying the stack on the swarm

Now our swarm is ready. You can check the master and worker node status using docker node ls

The * in front of the Id field represents the swarm node you are on.

Now lets deploy the stack. On the swarm master go to the folder where you created the docker compose file. Run docker stack deploy -c docker-compose.yml <stack_name>

Here are all the docker service commands:

Usage:  docker service COMMAND


Manage services


Commands:

  create      Create a new service

  inspect     Display detailed information on one or more services

  logs        Fetch the logs of a service or task

  ls          List services

  ps          List the tasks of one or more services

  rm          Remove one or more services

  rollback    Revert changes to a service's configuration

  scale       Scale one or multiple replicated services

  update      Update a service

List all the services created. In this case just one. You should be seeing that there are 4 replicas created. Lets see in which nodes they are created.

Run docker service ps <service_id>

You will be seeing all the running tasks of the service. tasks are nothing but containers running the service. In the NODE field. You will see that the tasks are running on different nodes of the Swarm. Mission Accomplished !

Scaling the Swarm

Now suppose you need to scale up the stack and run more tasks for a service. You simple use ` docker service scale "stack_id"="no of tasks"

In this case I scaled it to 7. You will see the progress as the service is scaled.

You can verify by running docker service ps <service_id> that there are 7 tasks running now.

Accessing the service

As the service tasks are running on multiple nodes. The exposed port 8080 is mapped to 80 on the external host. You can easily just go to the instance Ip address and check if the API is working.

  1. Working on the Master instance IP

2. Working on the Node instance IP

Thats it for part 1. In part 2 I will be adding more services and also monitoring the stack.

AWS launches EC2 Instance Connect

I was always envious of GCP for their Compute instances had the facility to SSH to the instance from the Browser itself. It it this straight forward:

  1. Launch a instance.
  2. Connect to the instance through the browser window by clicking the SSH button.gcpconnct.png


But AWS EC2 instances always had to be connected using the private key’s from either Putty or Git Bash/MobaXtrem/Cygwin etc. The Java client connectivity option NEVER worked for me accross all browsers.

Enter AWS Instance Connect !

With EC2 Instance Connect, you can control SSH access to your instances using AWS Identity and Access Management (IAM) policies as well as audit connection requests with AWS CloudTrail events. In addition, you can leverage your existing SSH keys or further enhance your security posture by generating one-time use SSH keys each time an authorized user connects. Instance Connect works with any SSH client, or you can easily connect to your instances from a new browser-based SSH experience in the EC2 console.

Now these are the steps if you need to connect to your Ec2 instance :

  1. Launch the instance in your preferred region following the standard steps.
  2. I am using Amazon Linux 2 as it comes preconfigured with EC2 Instance Connect.
  3. In other instances you will have to set it up. Its a one time step.
  4. The following Linux distributions are supported for Instance Connect:
  5. Once the instance is launched.
    1. Select the instance
    2. Click Connect button above.
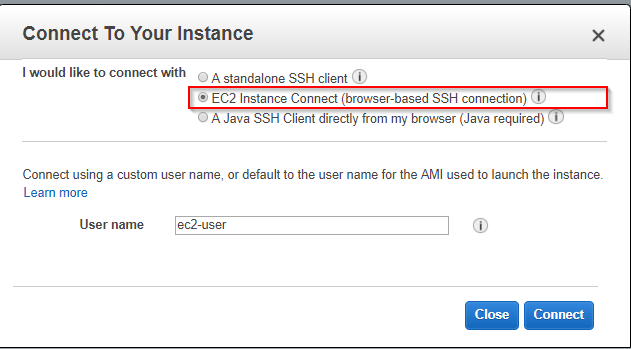
    3. Select the EC2 instance connect option. In the Username let it be the default user name.ec2con.png
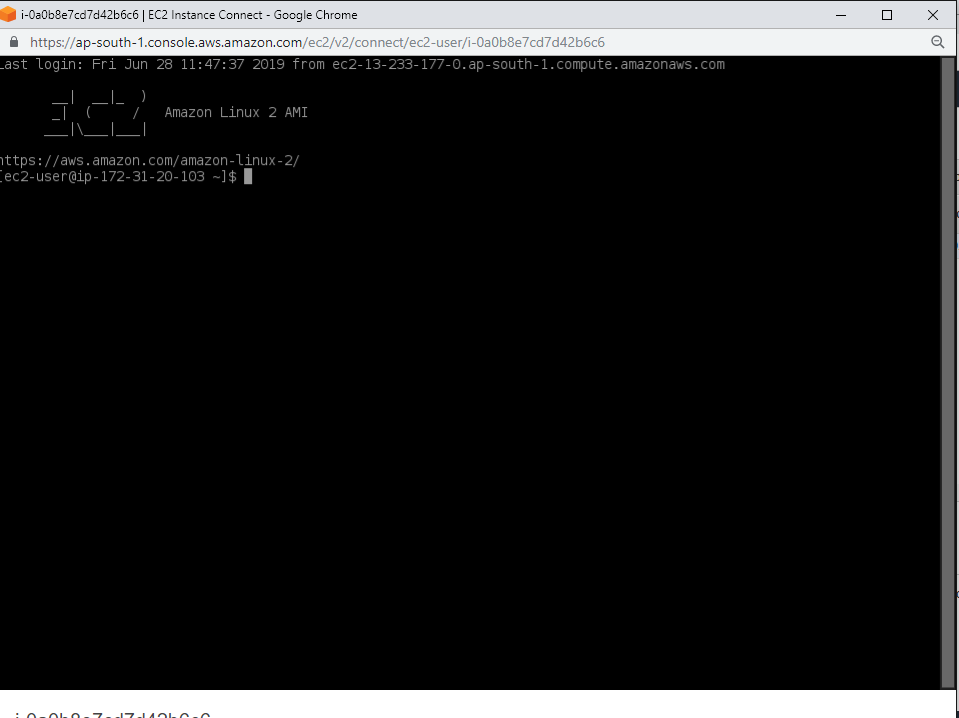
    4. Thats it. A new Browser window will appear. You have logged into the Instance !! without any of the ssh mess ! Easier and safer way right there.2019-06-28 17_24_30-Window.png


For more Information :

Setting up instance Connect

How to connect using AWS EC2 Instance Connect


Creating my Portfolio Website using Gitfolio

A good portfolio website (darshan-raul.github.io) is something which is very essential to show the person in front of you the skills and the work you have done. It doesnot have to be fancy with crazy animations but it should also be engaging for the visitor to stay longer and maybe give you a job?? 😀

I write this blog and also have a couple of Github Projects I want to showcase. Ofcourse there a tons of templates freely availble on the internet which can be modified according to our taste and then published. But I needed something subtle and comprehensive.

Enter: Gitfolio

This tool was so useful in creating a boilerplate webpage showcasing all my github data and projects in a systematic matter. You can also customize the way the projects are sorted. You can choose between themes.

Its just a 3 step process:

  1. Install gitfolio
npm i gitfolio -g

2. Build your gitfolio

gitfolio build <username>

<username> is your username on github. This will build your website using your GitHub username and put it in the /distfolder.

3. To run your website use run command

gitfolio run

4. Open your browser at http://localhost:3000


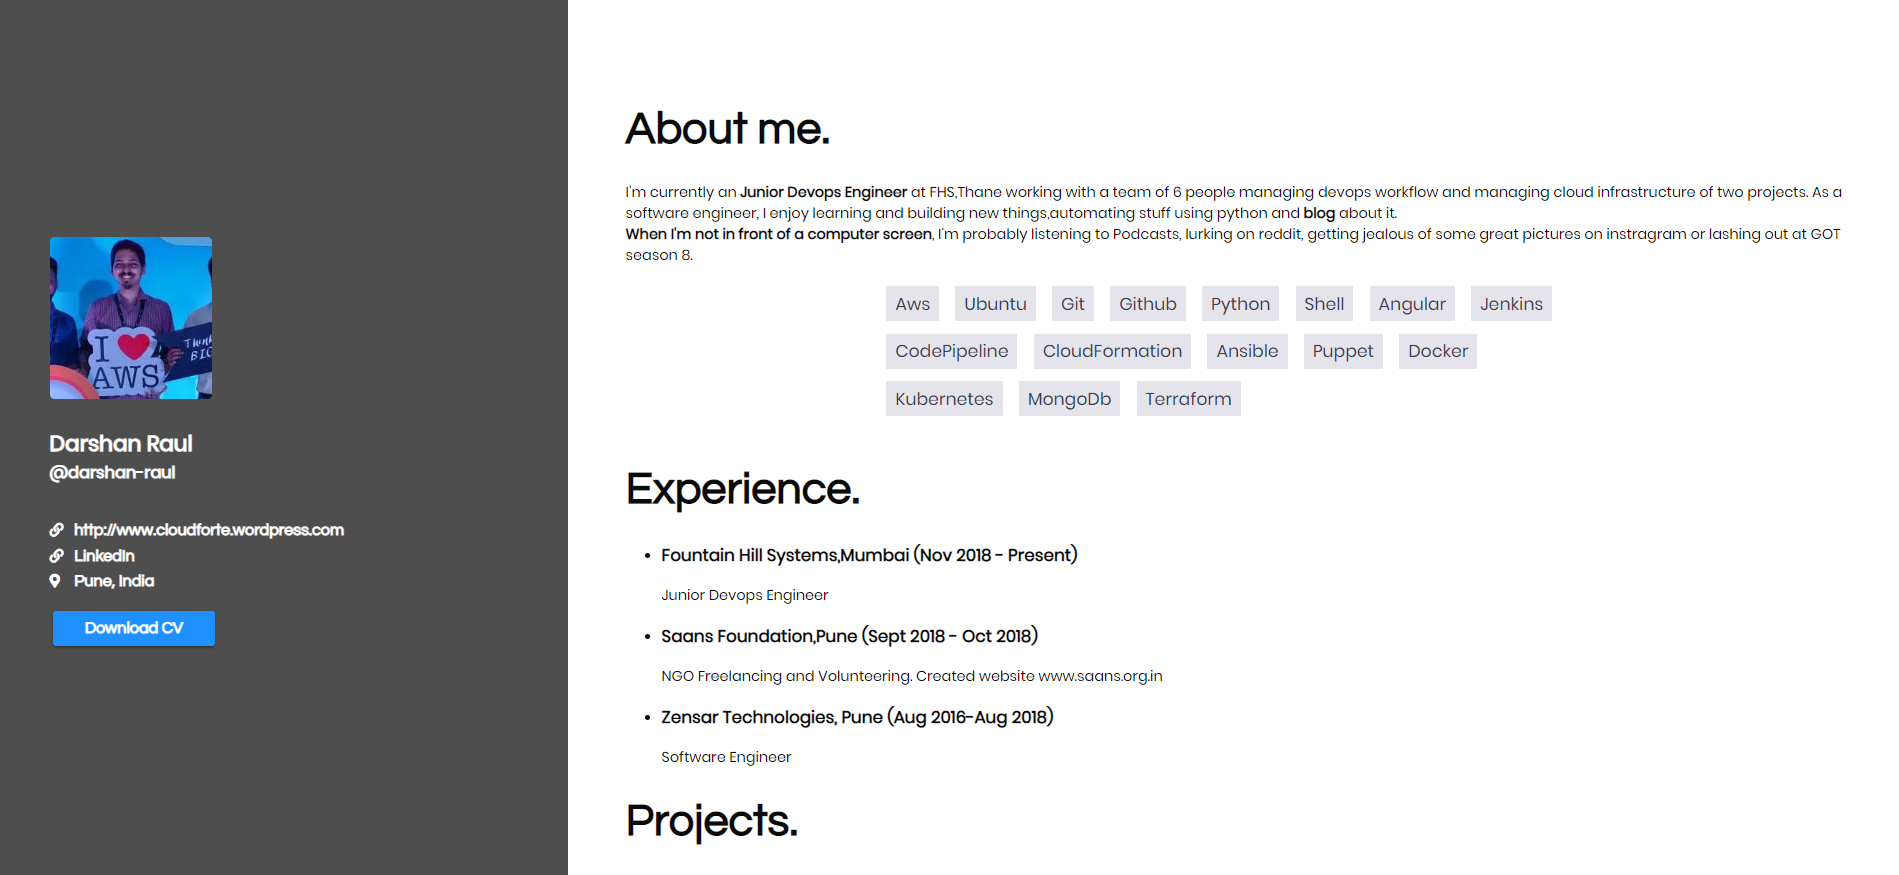
It is that straight forward. Ofcourse I made some modifications manually on the main html/css side and here is the result. Pure Black/white design 🙂


2019-06-26 03_45_41-Window.png


CI/CD on AWS Dashboard Web app using Jenkins

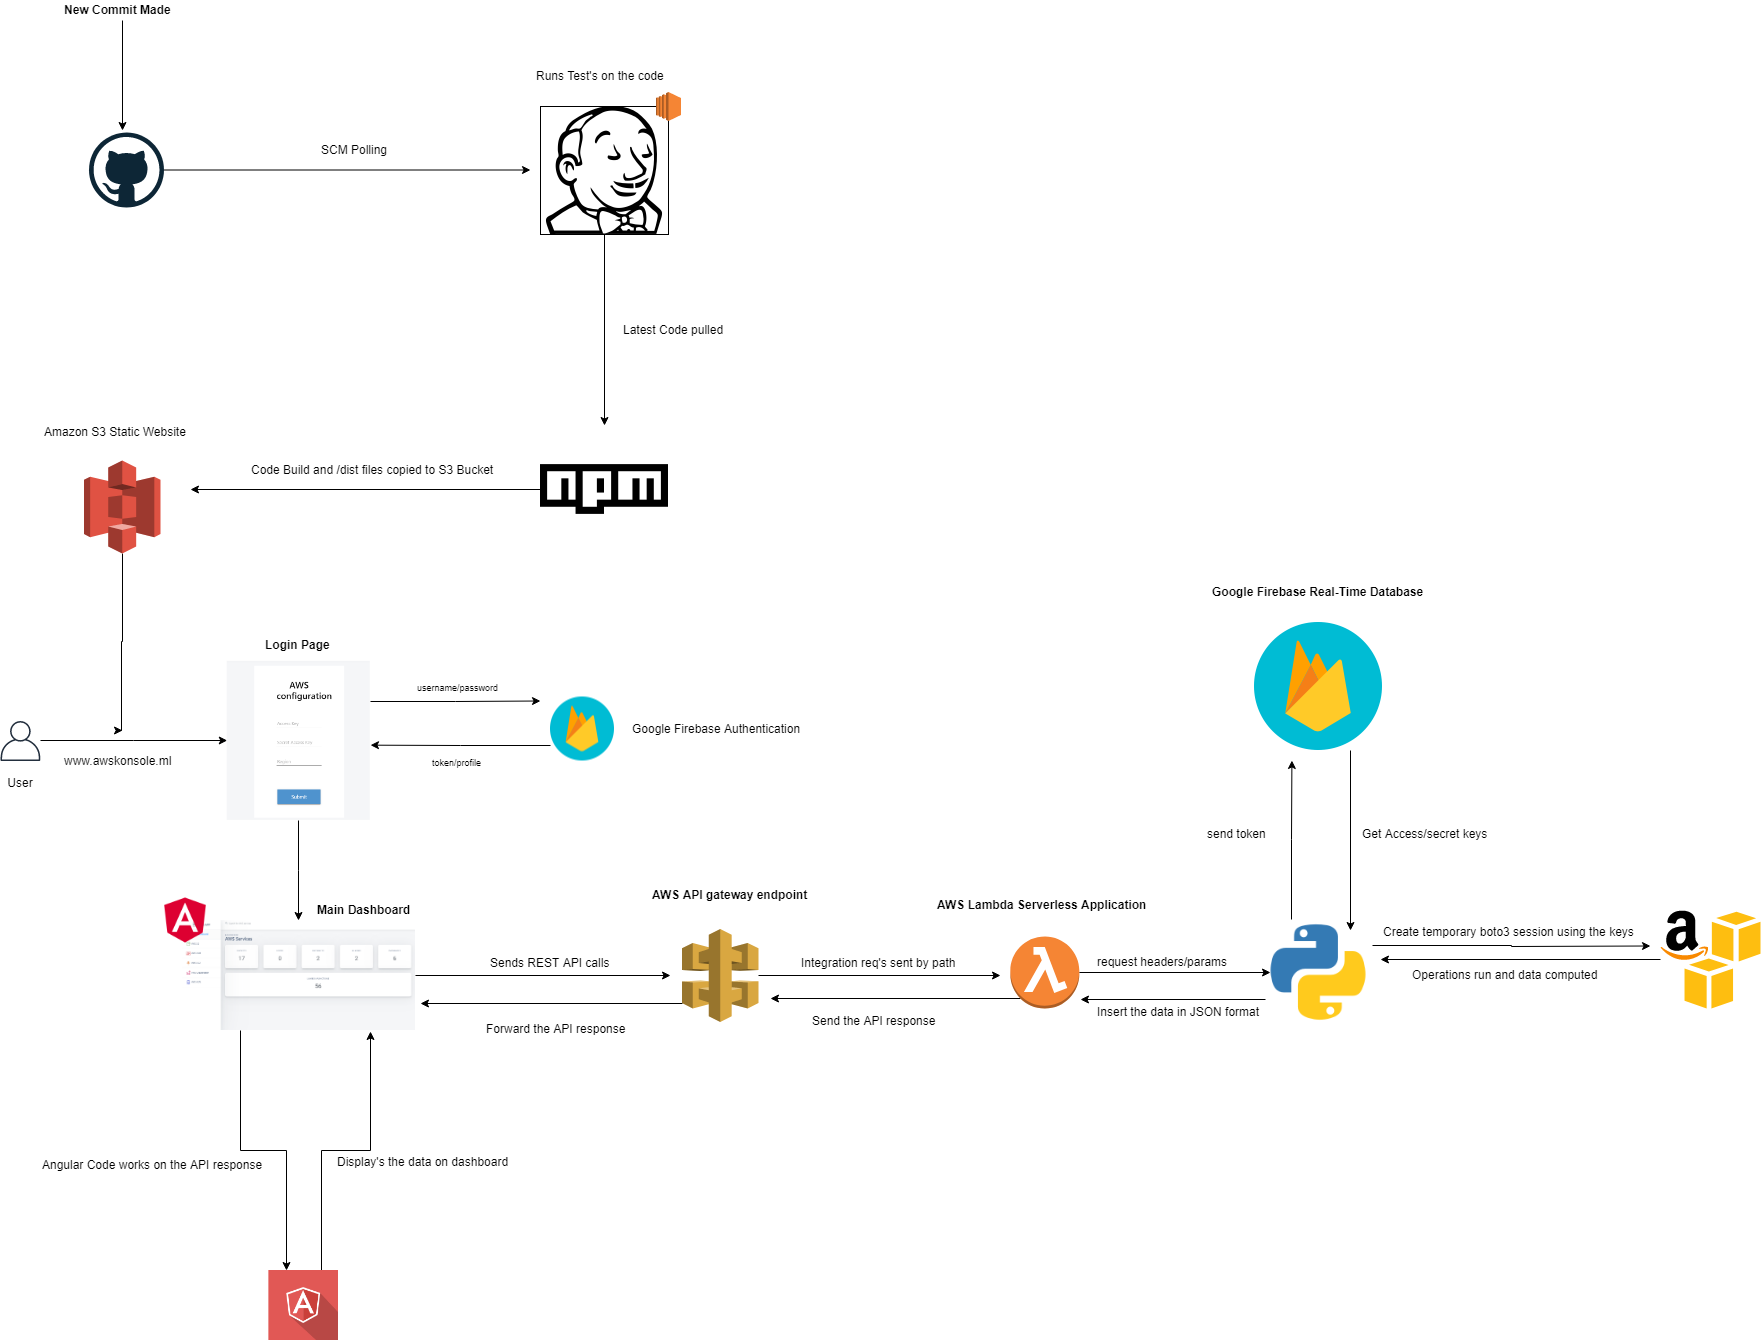
Here is the final architecture I intend with the app.

So I wanted to create a CI/CD pipeline wherein whenever I would commit the next major change on github, it should be built automatically and those /dist files should be uploaded to S3. Enter Jenkins 🙂

#! /bin/bash

sudo apt-get update

sudo apt install -y npm nodejs python-pip openjdk-8-jdk docker.io

wget -q -O - https://pkg.jenkins.io/debian/jenkins.io.key | sudo apt-key add -

sudo sh -c 'echo deb http://pkg.jenkins.io/debian-stable binary/ > /etc/apt/sources.list.d/jenkins.list'

sudo apt update

sudo apt install jenkins

pip install awscli

sudo ufw enable

sudo ufw allow 8080

sudo ufw allow 22


node {


   stage('Preparation') { 


      git 'https://github.com/darshan-raul/awsdashboard'


   }


   stage('Build') {

   dir("folder") {

        sh 'npm install'

        sh 'npm build --prod'

      }

    }


}
node {


   stage('Preparation') { 

      git 'https://github.com/darshan-raul/awsdashboard'


    }

   stage('Build') {

      dir("awsdashboard") {

           sh 'pwd'

           sh 'npm install'


       }

   }

    stage('Deploy') {

       sh 'npm run deploy'

    }

}

SSH Overview Part 1

 ssh [-b bind_address] [-c cipher_spec] [-D [bind_address:]port] [-E log_file]

         [-e escape_char] [-F configfile] [-I pkcs11] [-i identity_file] [-J [user@]host[:port]] [-L address]

         [-l login_name] [-m mac_spec] [-O ctl_cmd] [-o option] [-p port] [-Q query_option] [-R address]

         [-S ctl_path] [-W host:port] [-w local_tun[:remote_tun]] [user@]hostname [command]

Merging multiple Github repo’s into one – Submodule way

Created a new repo in github where all the repo’s will be stored


Copy this URL


clone the repo in your machine


git submodule add <repo url>
All the repos as folders in this main repo
All the repo’s will be in a single repo.

There are many other way’s to do this but this seemed straight forward 🙂

AWS Migration services

AWS Migration Hub Walkthroughs – AWS Migration Hub

Design a site like this with WordPress.com
Get started